

Bitcoin’s Next 10k Move: The 115.5k Pivot & 4h-200SMA
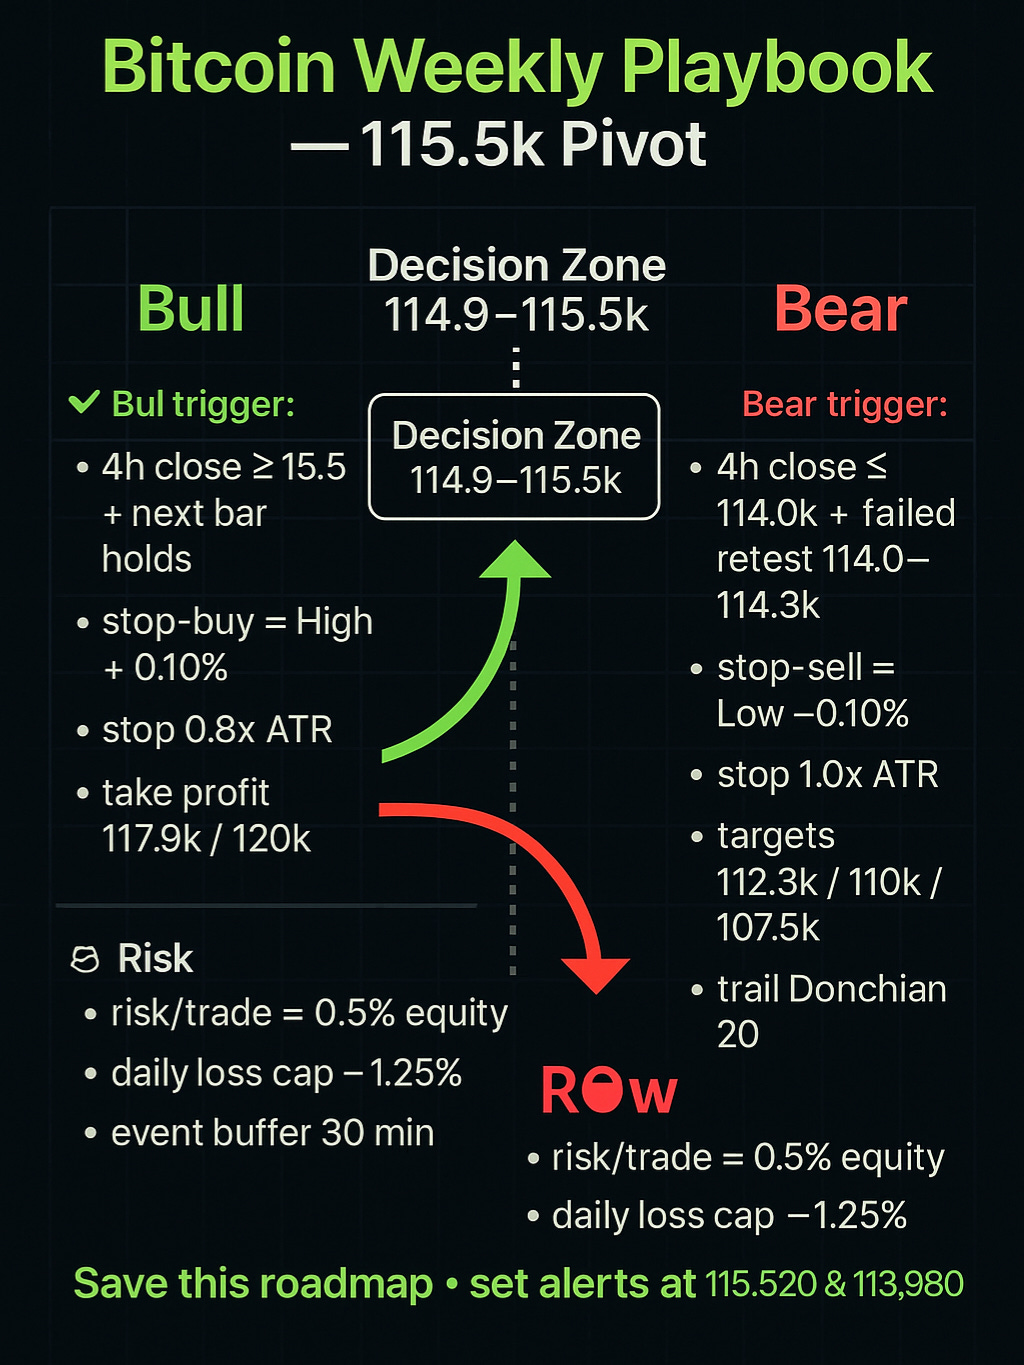
One clean 4h candle decides it. Close > 115.5k → 117.9k–120k. Close < 114.0k → 112.3k–110k–107.5k. Exact triggers, ATR stops, staged exits.

Weekly Prediction Review — Week ending 19 Sep 2025
What went right
Decision levels worked. We framed the week around two gates: bull above 115.5k and bear below 114.0k (with failed retest). Price never built value above 115.5k and ultimately broke 114.0k, validating the bear path.
Downside target hit. Your 4h chart shows prints near 112.36k, which aligns with our first objective 112.3k. The path 114.0k → 112.3k played out cleanly.
Chop avoidance. The close-based rule (wait for the 4h close, then confirm) kept us out of the mid-range ping-pong between 114.9k–115.5k early in the week.
Risk structure was adequate. ATR-scaled stops and staged exits (T1/T2 + trail) provided a mechanical template that would have banked partials into the first push.
What can be Improved
Retest timing. The “failed retest” condition after the 114.0k break likely came quickly; if we were slow to arm the stop-sell on the confirming bar, slippage/late fill reduced R-multiple.
Trail aggressiveness. Using a Donchian-20 (1h) / Chandelier(2.5×ATR 4h) may have tightened during volatility expansion, risking premature exit before 110k follow-through. Consider volatility-adaptive trailing (e.g., widen by 10–20% when ATR spikes).
Re-entry logic. After T1 at 112.3k, rebounds were sharp. Without a secondary entry rule (e.g., rejection of VWAP/previous support turned resistance), we may have missed a second leg.
Event buffer discipline. If any entry occurred within 30 minutes of a high-impact headline, fills likely worsened; stick to the buffer to reduce slippage variance.
One-liners to carry forward
Right: “Wait for the close; below 114.0k is the trade, 112.3k is the first stop.”
Wrong: “Anticipating the break or trailing too tight during the first impulse.”
Action tweaks for next week
Pre-stage both orders; auto-activate only after the 4h close confirms.
Add a secondary short trigger: after TP1, if price retests 114.0–114.3k and rejects with 1h RSI < 50, arm a fresh stop-sell (same ATR framework).
Make the trail ATR-adaptive (+10–20% band when ATR > its 90-day median).
Bitcoin analysis September 23, 2025
TL;DR (for fast readers)
Where price sits: Riding the 4h-200SMA and hugging the bottom rail of a rising wedge / regression channel.
Decision point: First clean 4h close above 115.5k or below 114.0k sets the tone.
Bull path: Reclaim/hold 115.5k → run at 117.9k, then 120k; trail if breadth/momentum expand.
Bear path: Lose 114.0–114.3k on a failed retest → 112.3k → 110k → 107.5k (−σ lane).
Strategy: Trade mechanical triggers only, with ATR-based stops, staged exits, and a daily loss cap.
Why it matters: We’re perched at an inflection where one clean 4h candle can swing multi-day flows.
The Market Structure in One Picture (What the chart is shouting)
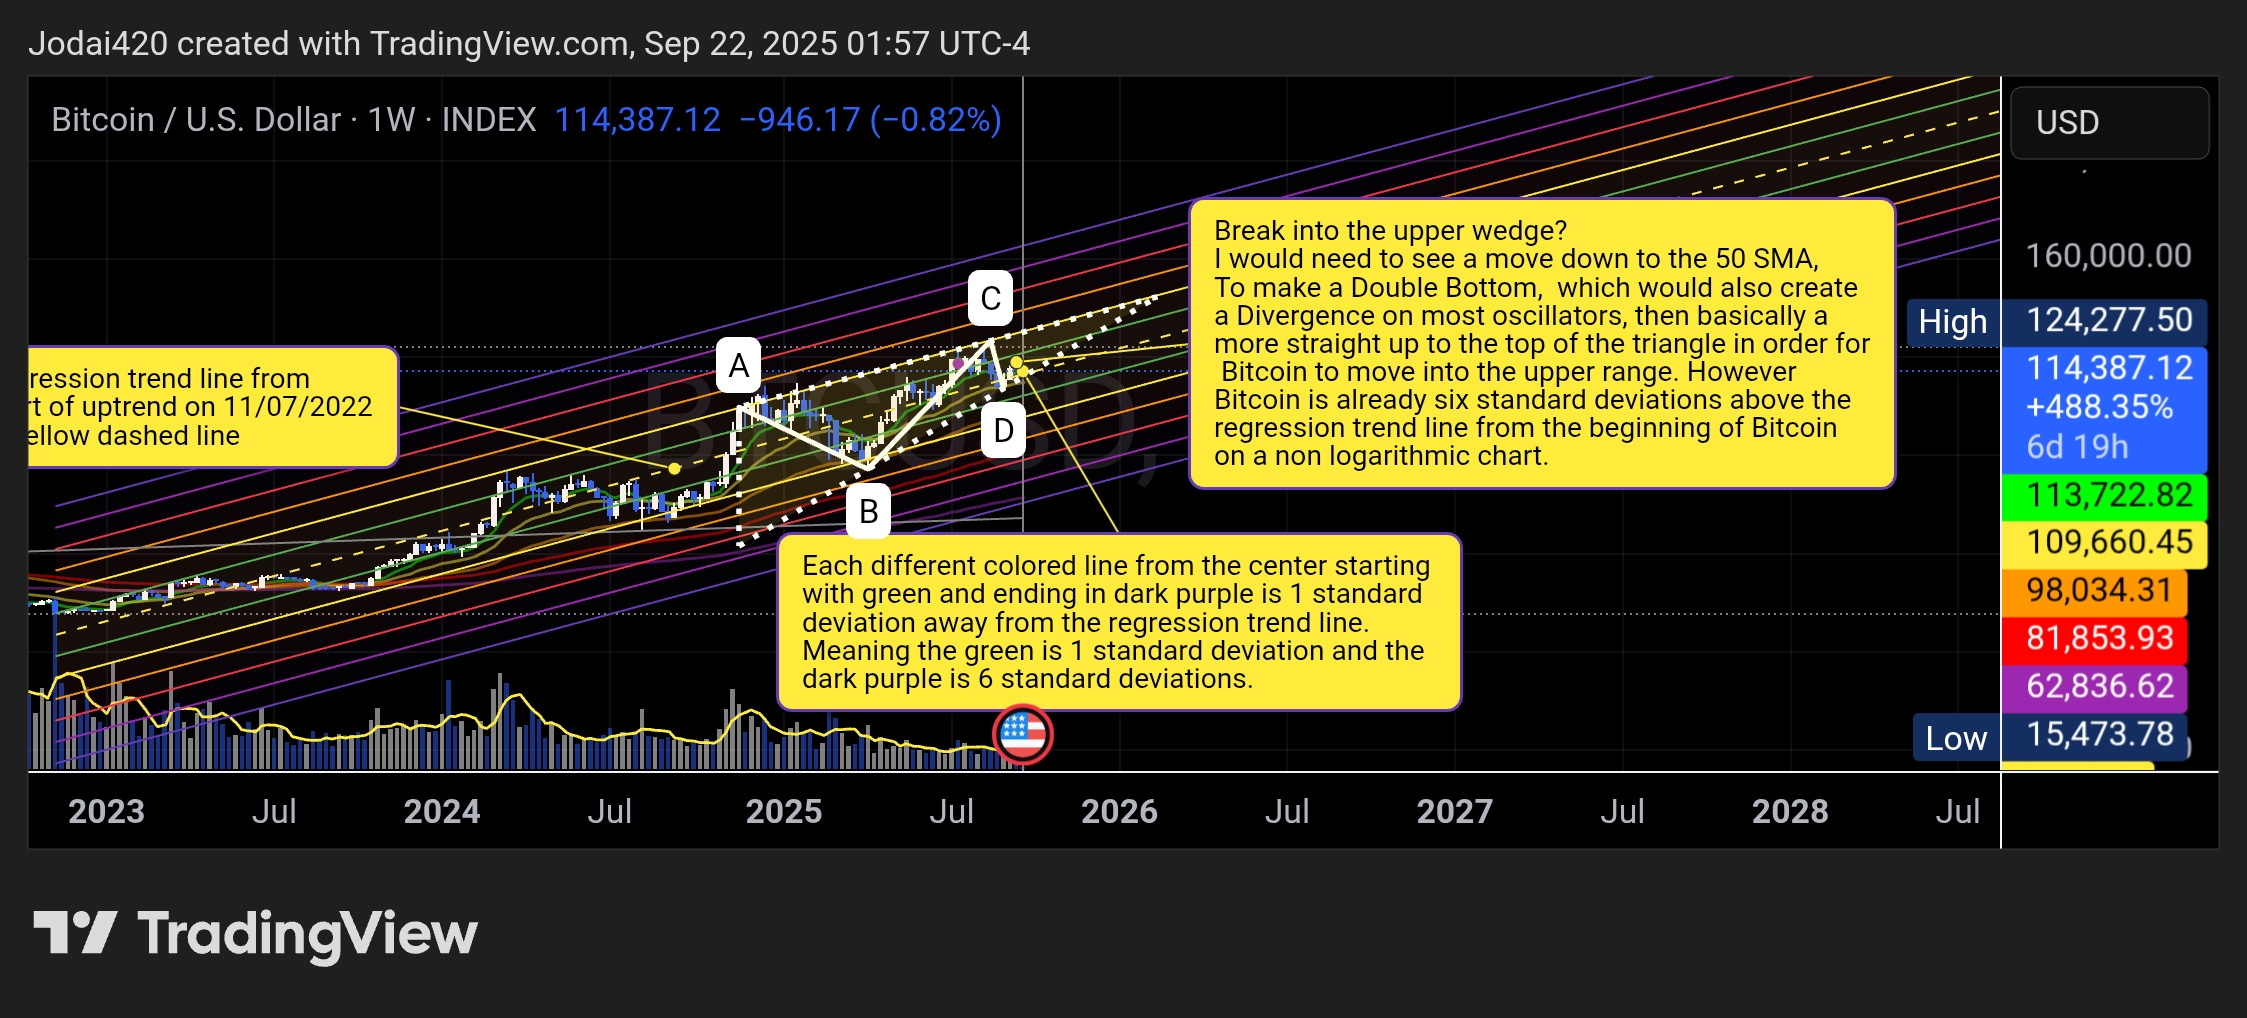
Weekly: Price travels inside a long, rising regression channel. Your multi-σ overlay shows we already tagged extended bands earlier in the cycle; staying power now depends on whether pullbacks hold mid-channel. The A–B–C–D sequence you marked suggests a completed down-swing from “C” into “D,” followed by a base attempt.
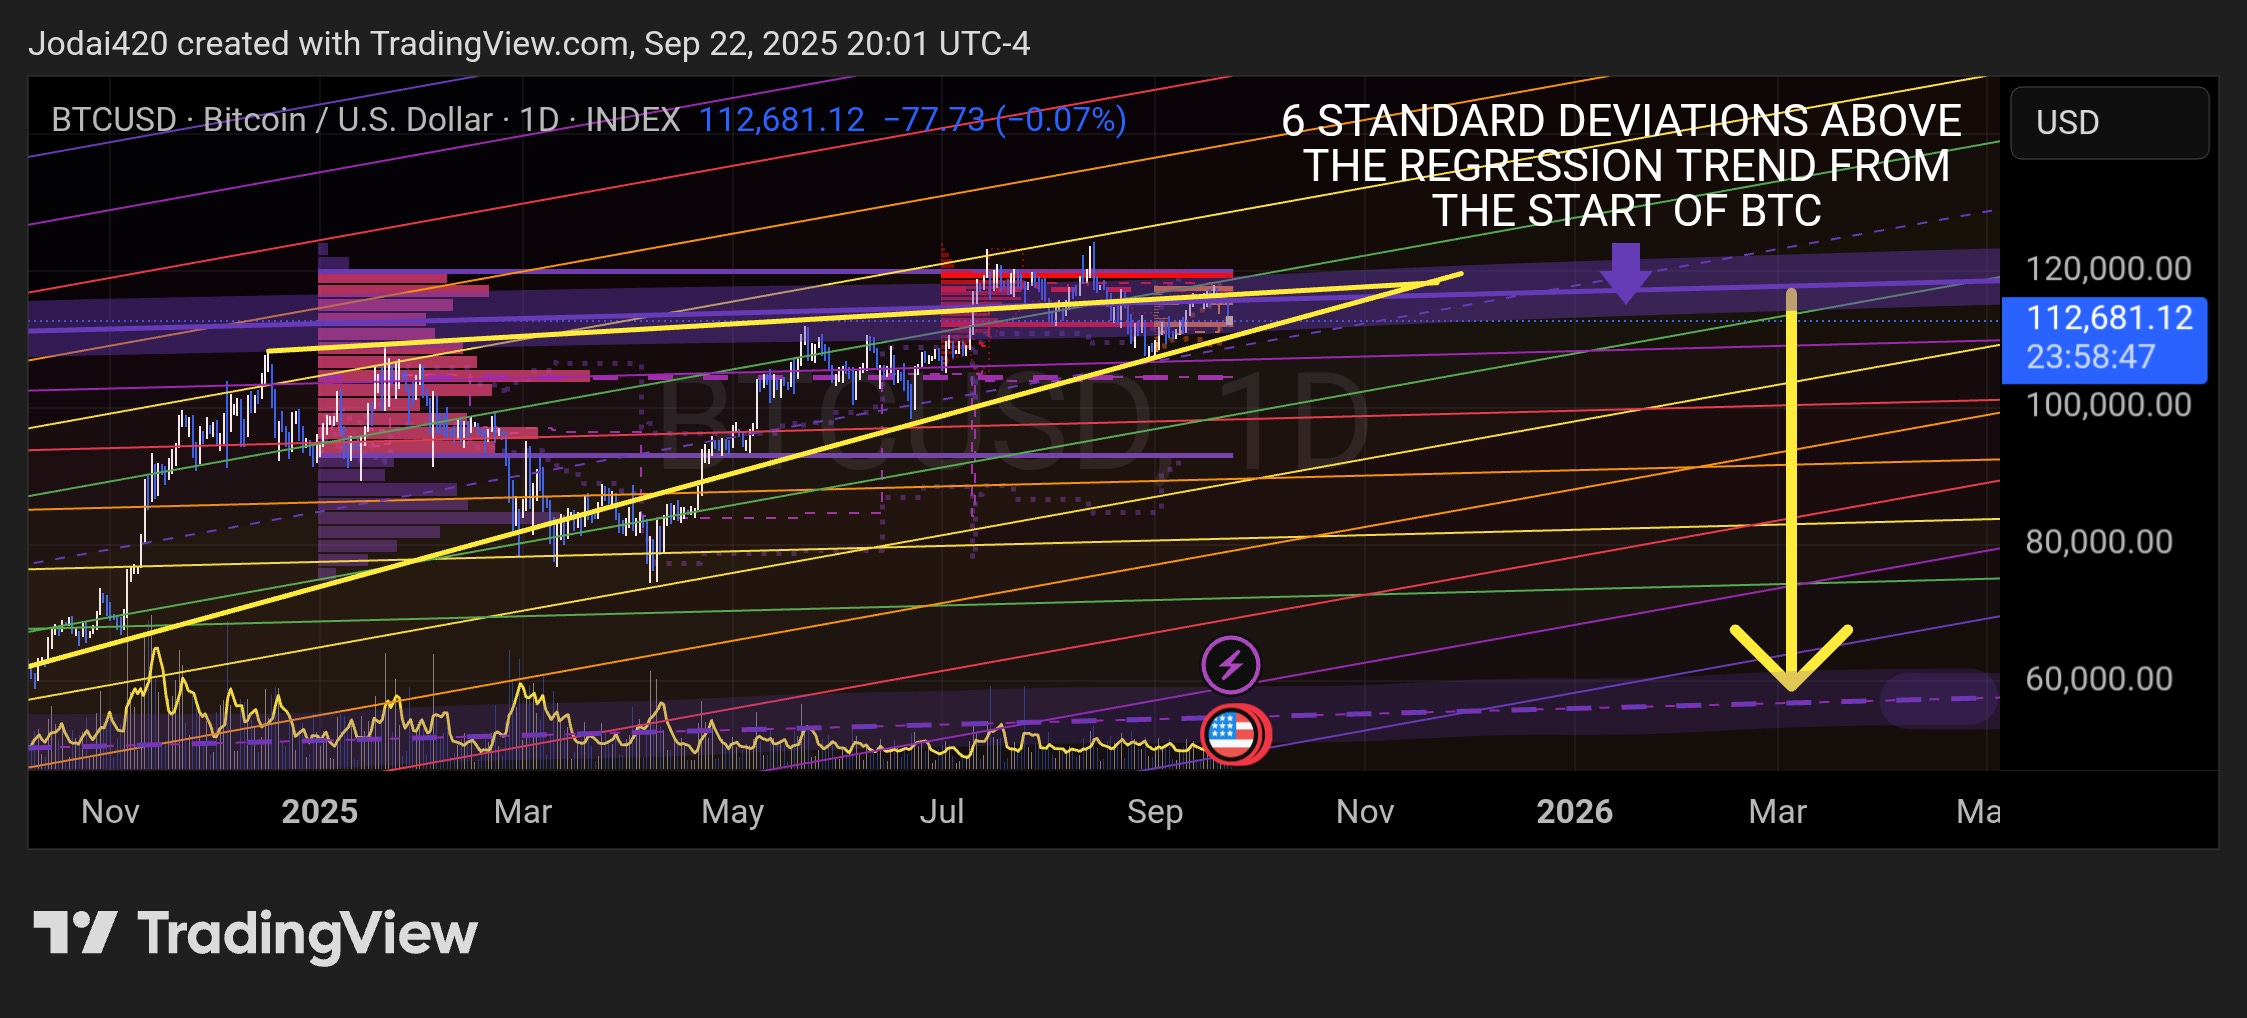
Daily: The instrument is coiling on top of the 6th standard deviation above the all-time regression trend for Bitcoin. The mid-line / monthly midpoint[Point of Control(POC)] clusters near 114.9–115.5k. That zone is a magnet: reclaim and hold → continuation; fail → gravity resumes toward the wedge base and like it did at the beginning of 2025 it might drop below that wedge line and they spring type position. If price moves down with very little volume and a large distance traveled that's a spring and a bear trap. However if it does have very high selling volume, and it drops below the regression trend for this bull run will get one Spike back up to back test the regression Trend before we dumped to two to three standard deviations below the regression trend. If that happens, I'm pretty sure that that would be the end of the road for this Bitcoin Bull cycle.
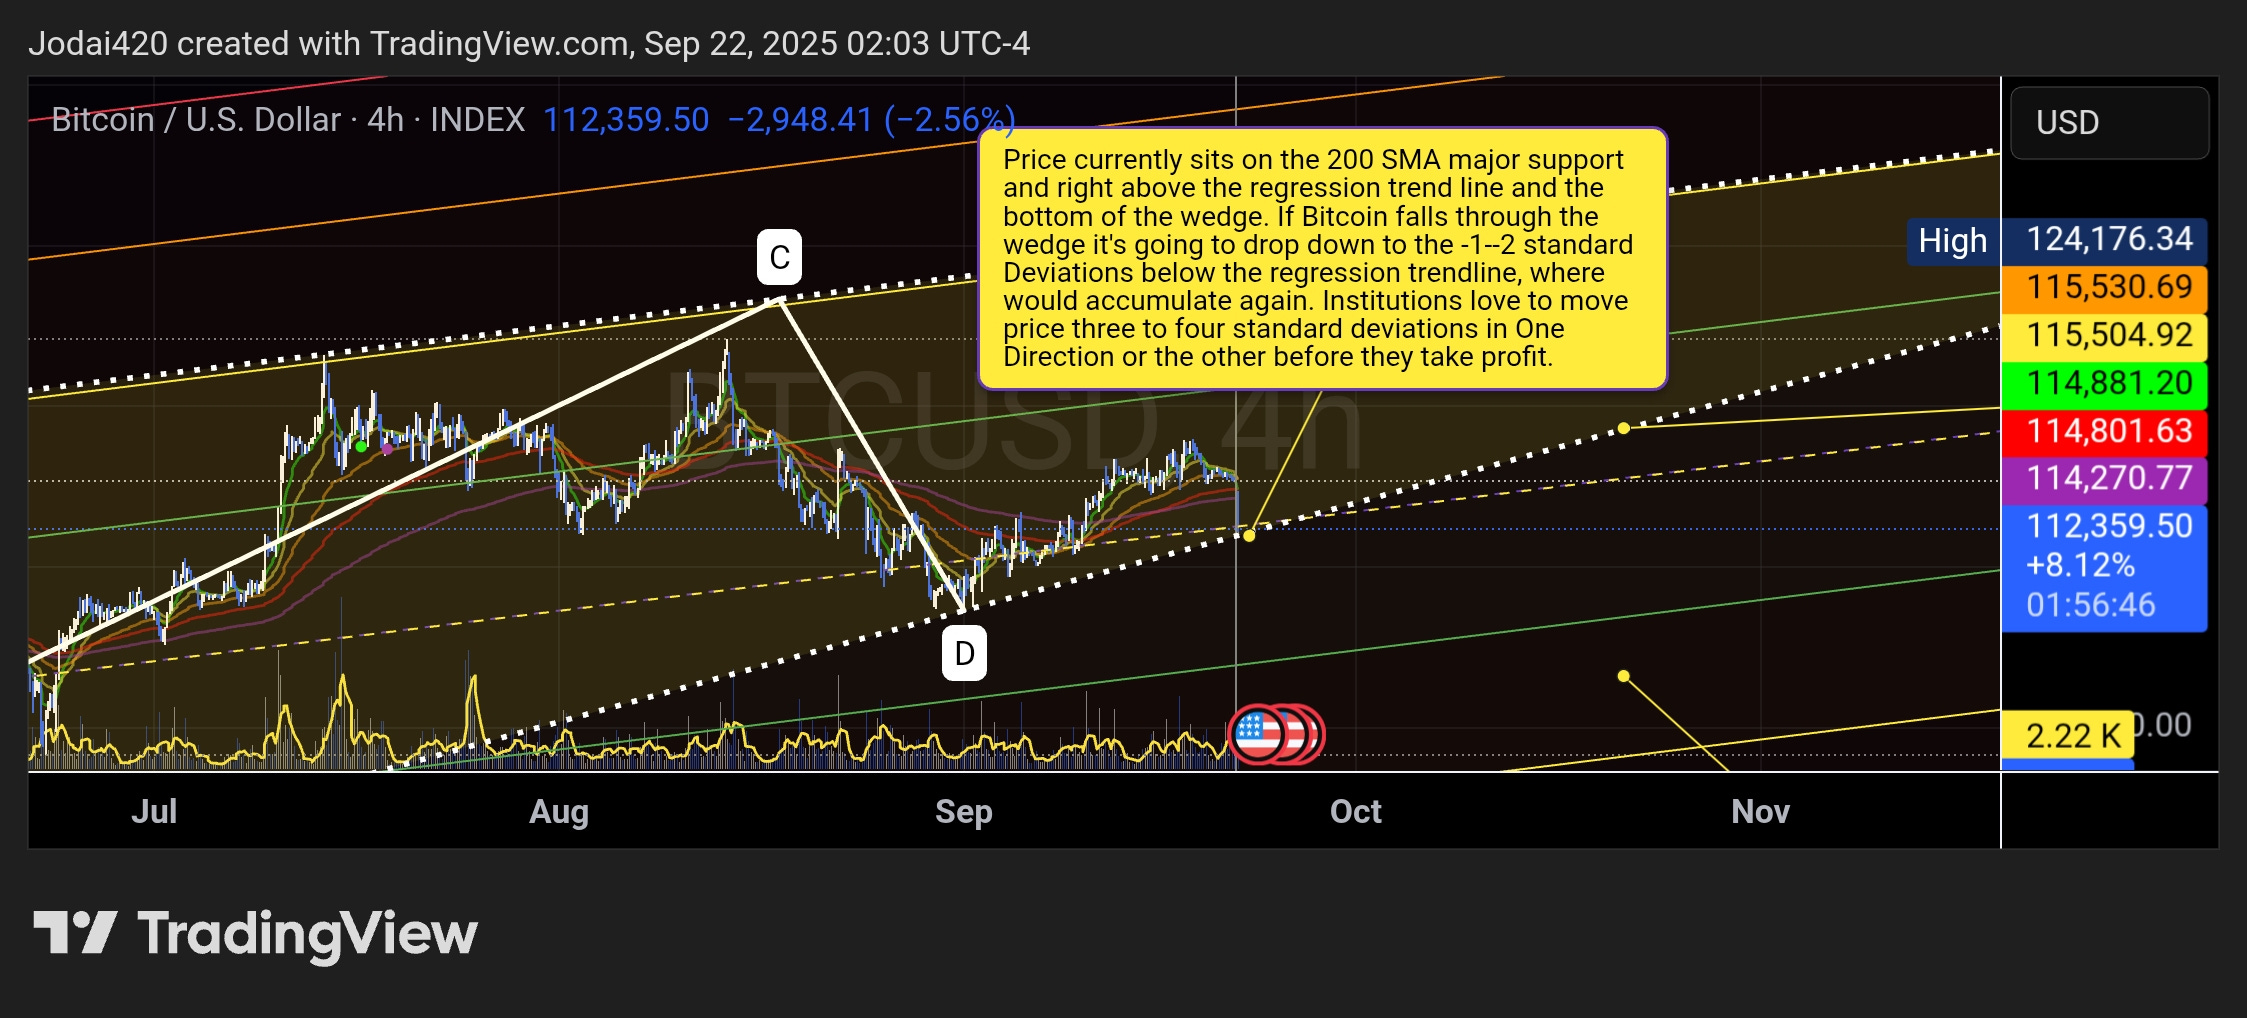
4-hour: This is the tactical battlefield. Price keeps testing the 200SMA and the wedge’s lower rail. Oscillators recently rolled over; that’s why we respect 114.0–114.3k as “last support.” Lose it on a failed retest, and we don’t argue—we execute the short plan.
Key Levels (Mapped to Order Flow)
120,000 – Top-of-range extension if momentum expands above 117.9k.
117,900 – Tight local supply; recent reaction high cluster.
115,500 – The weekly pivot: value acceptance above here fuels a squeeze.
114,900–114,986 – Daily midpoint / rolling magnet (expect whips if camping here).
114,300–114,000 – 4h-200SMA and structural shelf. Break = trapdoor.
112,300 – First downside objective (prior value shelf / wedge base projection).
110,000 – Psychological + historical balance node.
107,500 – −2σ lane / high-probability spot for responsive buyers on washouts.
The Two Primary Scenarios (With Exact, Doable Triggers)
1) Bull Continuation: “Close > 115.5k, Then Hold”
Setup (must be true):
4h candle closes ≥ 115,500.
Next 4h bar holds above 115,500 (no immediate rejection close back under 114,900).
Entry (mechanical):
Place a stop-buy at High of trigger bar + 0.10%. If not filled in 6 bars, cancel and reassess.
Invalidation:
4h close back below 114,900 (we do not negotiate with failed breakouts).
Targets:
T1: 117,900 (scale 1/3).
T2: 120,000 (scale 1/3).
Remainder: trail (see below).
Risk & management:
Initial stop: 0.8 × 4h ATR below entry.
Trail after +1.5R: Chandelier(2.5 × 4h ATR) or Donchian-20 stop—use the tighter one per bar.
Time stop: If after 5 sessions the trade is < +1R, exit at market.
Logic:
Above 115.5k you’re back inside trend-continuation territory. Liquidity thin-slices often funnel price to prior supply at 117.9k; if flows expand (open interest, spot/futures basis, breadth proxies), the path to 120k opens.
2) Bear Breakdown: “Lose 114.0k, Fail the Retest”
Setup (must be true):
4h candle closes ≤ 114,000.
A retest to 114.0–114.3k fails (wicks and closes back below).
Entry (mechanical):
Place a stop-sell at Low of rejection bar − 0.10%. Cancel after 6 bars if not triggered.
Invalidation:
4h close back above 114,900.
Targets:
T1: 112,300 (scale 1/3).
T2: 110,000 (scale 1/3).
T3: 107,500 (trail remainder).
Risk & management:
Initial stop: 1.0 × 4h ATR above entry.
Trail after +1.5R: Donchian-20 stop on 1h (exit long if 1h close > upper band / exit short if < lower band).
Time stop: Exit after 4 sessions if < +0.8R.
Logic:
A clean break plus a failed retest usually activates trend-followers and stops below 112.3k. Sub-110k prints are common if the first thrust catches late dip-buyers wrong-footed.
The Chop Filter (How to Avoid Death by a Thousand Paper Cuts)
If the market ping-pongs between 114.0–115.5k with alternating 4h closes, do nothing.
Require both: (1) your closing condition, and (2) your entry confirmation on the next bars.
Reset ideas daily; no averaging into invalidated setups.
Multi-Timeframe Gatekeeping (Why Your First Filter Is the Best Stop)
Trend Gate (Daily): Trade long only if daily price is above the 100/200-SMA stack, short only if below.
Volatility Gate (Daily):
ATR(14)/Closeabove its 90-day median → high enough expansion to justify swing risk.Timing Gate (4h/1h): For longs, RSI(1h) > 50 after the pivot reclaim; for shorts, RSI(1h) < 50 after pivot loss.
Causality Rule: Execute on close; never read shifted or forward-plotted buffers (no look-ahead).
Position Sizing, Risk, and Trade Hygiene (Copy, Paste Format)
Risk per trade: 0.5% of account equity (feel free to use 0.25–0.75% based on comfort).
Stop distance: As specified by scenario (ATR-scaled).
Contracts/size formula:
position_size = floor( risk_usd / (stop_points × $ per point) )
(Spot/CFD users: replace$ per pointwith notional tick value.)Daily loss cap: −1.25% of equity → flat for the rest of the session.
Event filter: If a high-impact release (macro, ETF flows, protocol events) is ≤ 30 min away, defer new entries.
No pyramiding on the first impulsive leg; consider re-entries only after a fresh setup fires.
Why These Levels Matter (A Quant’s View)
115.5k is not magic; it’s a confluence node (daily midpoint, recent value area boundary, repeated breakdown/reclaim level). Confluence compresses inventory—once breached, it unlocks trapped flow.
The 4h-200SMA around 114.0–114.3k won’t hold forever; it’s where short-term participants test dip-buy reflexes. If it breaks and fails on retest, mean-reverting hands flip to supply, making 112.3k straightforward.
112.3k → 110k → 107.5k line up with −σ regression lanes and historic response zones—perfect for measured targets (not opinions).
Trade Examples (So You Can Visualize the Flow)
Example A — Bull Case
06:00 CT: 4h bar closes at 115,620.
10:00 CT: Next bar holds above 115.5k; high prints 115,900.
Entry: Stop-buy High + 0.10% ≈ 116,016; fill at 116,020.
Stop:
0.8 × ATR(4h)→ assume 4h ATR = 1,200 points → stop at 115,060 (−960 pts).Size: With $ risk = 0.5% equity, convert to contract/coin size via the formula.
Targets: 117,900 (+1.9k) then 120,000 (+3.98k). Trail after +1.5R.
Example B — Bear Case
14:00 CT: 4h close at 113,920 (below the shelf).
18:00 CT: Retest wicks to 114,180, closes back under 114,000.
Entry: Stop-sell Low − 0.10%; filled at 113,800.
Stop:
1.0 × ATR(4h); if ATR = 1,200, stop = 115,000.Targets: 112,300 → 110,000 → 107,500; trail once +1.5R.
Risk First: Common Failure Modes (and the Fix)
Front-running the close: Intra-bar peeks inflate losers. Fix: Execute only on the bar close; pending orders go live only after the close validates the gate.
Ignoring the failed-retest condition: A pure break often whips back. Fix: Bears demand a retest rejection at 114.0–114.3k; bulls demand hold above 115.5k.
Letting small winners turn to losers: Without staged exits you’ll give back edges. Fix: Scale and trail exactly as specified.
Trading news candles: Event spikes distort slippage/fills. Fix: Respect the 30-minute buffer.
For System Builders: Convert the Rules into Code
Inputs:
Timeframes: 1W, 1D, 4h, 1h
Indicators: SMA(100/200) on 1D; ATR(14) on 4h; RSI(14) on 1h.
Signals:
bull_gate = close_4h_close ≥ 115500 and close_next_bar ≥ 115500bear_gate = close_4h_close ≤ 114000 and retest(114000..114300) == reject
Orders:
Long:
buy_stop = high_trigger * 1.001(≈ +0.10%); stop= entry − 0.8*ATR4hShort:
sell_stop = low_reject * 0.999; stop= entry + 1.0*ATR4h
Management:
Partial exits at
+1.5R,+3R; trail usingmax(Chandelier(2.5*ATR4h), Donchian20_stop)
Risk:
Position sizing formula as above; daily loss cap enforcement.
Excerpt (shareable):
“The plan is simple: trade confirmation. Above 115.5k we buy strength; below 114.0k we sell weakness. Risk is ATR-based; exits are staged and trailed. No exceptions.”
Mindset and Expectations
The plan is binary by design. If you catch yourself inventing reasons to “still like the long” when price is living below 114.9k, you’re drifting away from the system. The point of mechanical rules isn’t to be right on every trade; it’s to be right on behavior: pay for information, press when you have it, and quit when you don’t.
What Would Change This Roadmap?
A daily close >= 116.5k followed by value building above 115.5k would upgrade the bull case: you’d expect pullbacks to find bids above 115k and squeezes to 120k.
Conversely, a daily close <= 112.3k with expanding volume would likely extend the bear path into the −σ drift toward 110k/107.5k (and would warrant tightening profit-taking on shorts to avoid snapbacks).
Actionables for the Week Ahead
Disclaimer
This publication is for educational purposes only and is not financial advice. Trading involves risk, including the loss of principal. Past performance does not guarantee future results.